


This is my very first post made for PWP blog and this time I want to show you a few easy and fast techniques with embossing powders.
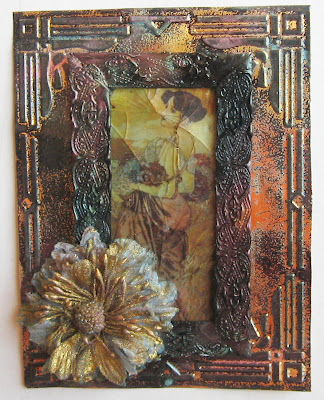

The main portion of this project is an Art Deco art piece made with PWP cut out image from Summer clip art sheet.
And the first technique used here is a Crackled Glass technique.


It's not a real tutorial, but a snap sample of different techniques, so here it is in just a few words:
Cover your cut out image with a think layer of Clear embossing ink and add Ultra High (UTEE) embossing powder over it. Heat emboss it and let it cool. Add another layer of clear embossing ink and another layer of clear embossing powder. Third time is even better, so make it once more. Now put this glass look piece into your deep freeze section and wait for like 15 minutes. Take it off and break the " glass" with your fingers. Add some brown ink over it. You central piece is all done.
Now to the frame:
Hand cut a chippboard frame that fit the central image. Cover it with clear embossing ink and think Black embossing powder. Make it 3-4 times and please, keep your fingers out of the hot surface! Add a random mix of 2-3 Perfect Pearls over the heat embossed surface and heat it again.


Now grab a stamp from your PWP collection: I used a strip from Build a Shrine set as the size was just perfect for the frame size. Heat each frame part and stamp with your stamp into the hop surface. Let it cool and then make the same procedure with 3 more frame parts. Glue the frame over the image with 3D foam glue.
And now for the outer frame. Dry emboss the thick gold foil with an embossing folder (I used Cuttelbug Art Deco folder). Cover the embossed parts with a bit of clear embossing ink and this time heat emboss with Ultra fine black powder. Let it fry and add some Perfect pearls over the frame. Glue the smaller frame over the larger one .
Now you can alter a flower. I used Prima fabric flower with some Gold embossing powder and a bit of the same Perfect pearls and the flower shrinked by the heat to the right for this project size (was a huge one before heating). Glue the shrinked flower over the frame and your art piece is done.
I also enter this to some web challenges:
Embossing for Unrurely paper arts
Embossing for Frosted designs
I also enter this to some web challenges:
Embossing for Unrurely paper arts
Embossing for Frosted designs
  |


4 comments:
Wow....what a great frame! Love all those yummy colors. Thanks for playing along with us at Frosted Designs!
So glad you entered your gorgeous piece from Paper Wings with us at Frosted Designs! Great techniques with embossing!! So glad you joined us in the Frosted Designs embossing challenge!!
I realy love this card! Thanks for sharing at FD!
Sandra
LOVE all the different embossed layers you applied to the card! thanks so much for playing along with us over at Frosted Designs Embossing challenge, waving hi from the hills of North Carolina ♥
Post a Comment