


I made this vine bottle cover once about 10 weeks ago for Cheery Lynn designs Dimensional Leaves sets release- but it was a common post, not my personal one.
Since then I got a lot of comments in my own blog asking for a tutorial- and as the original project was sent to CHA show and it not coming back- I decided to make another similar, but not the same one, and this time with a full tutorial of how to make this project and to share it with Fave Crafts site
Since then I got a lot of comments in my own blog asking for a tutorial- and as the original project was sent to CHA show and it not coming back- I decided to make another similar, but not the same one, and this time with a full tutorial of how to make this project and to share it with Fave Crafts site


Supply list
Patterned paper: Bo Bunny
Dies : Cheery Lynn Designs
Letter stickers :Heidi Swapp, MLS
Glitter glue: Ranger
Other:Kraft paper, wire
Transparent packging: Tim Holtz for Advantus
This is mostly about recycling and die cutting very easy project, and the only thing that takes time here is this glitter glue drying time.. LOL...
So here we begin:
1. Use the acetate box for your recycling, cut the upper and lower lids as shown on a final photo of the project.
2.Gather your supplies: a piece of a double sided paper - I used Bo Bunny, your dies from Cheery Lynn Designs , Glues, some distress inks from Ranger and some glitter Ranger glue.
Cut the rectangle about 5.5* 6 '' size from the patterned paper and then die cut the rectangle about 1/8'' less from both sides and die cut it with your Cheery Lynn Designs XL Scalloped Coved Rectangle die from the set- I used the 3 rd large die size here.
Cut another rectangle about 2*3.5 ''size and then die cut with the same die set again, using your smallest die from the set.
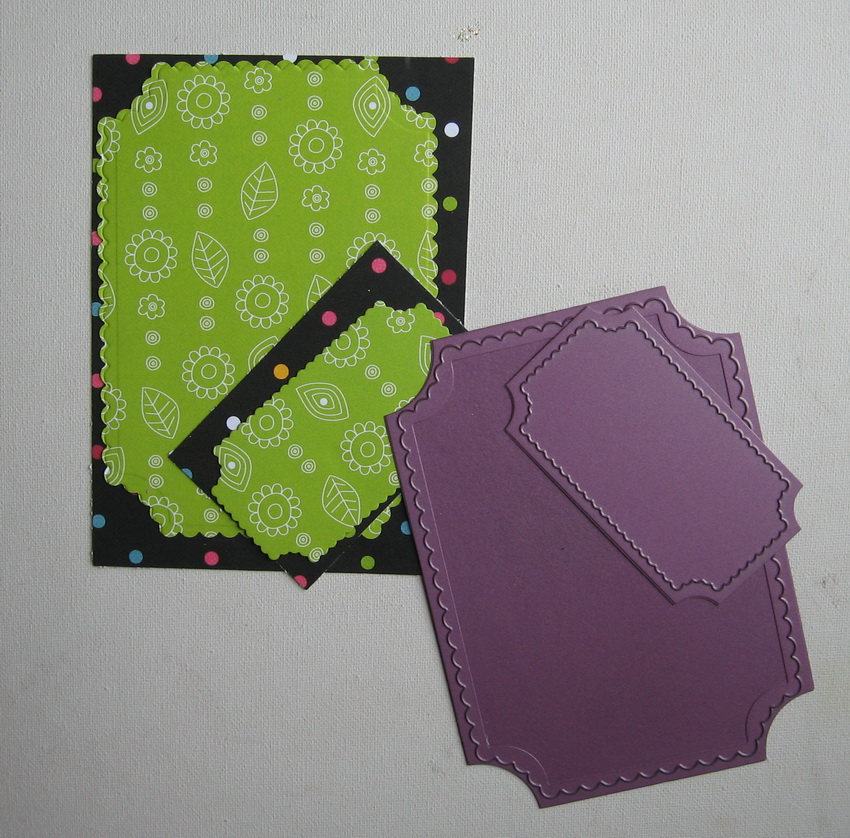
3.Now adhere the die cut pieces over the rectangles , round the rectangles corners if you wish before.
4. Adhere both glued labels over the acetate box as shown
5. Die cut lots and lots of dimensional leaves from both of small leaves sets from Cheery Lynn Designs dies - use the same green paper and another green papers leftovers, emboss the leaves with the same die using your embossing pads.
Ink the leaves with distress inks , crimple them a bit and adhere over the cover on the right side.

6. As a last step make some grapes using your glitter glues and some wire swirls and glue the swirls over a finished project.
Die cut a bubble label using your Cheery Lynn Designs Bubble expression # 3 set
Add some pearls on the corners- if you like them..
Glue this two step buuble die cuts one over another, add some letters sentiment over the small coved and a bubbled label-as shown , adhere the bubble spot on your project and enjoy it!


4 comments:
This is a sweet idea, great gift for someone as well. Thanks for joining us on the ABC DT challenge for birthdays!
Great take on the birthday challenge...and wonderful tutorial. Thanks for joining us at ABC DT Challenge. Be sure to add our blinkie to your sidebar for the chance to win even more. sa
Clever idea and wonderful execution! Thanks for joining us at ABC!
genius!! love it.. :)
Im voting for you.. :)
Post a Comment